Blue Gale Scout


Oh, Honbo, Honbo, Honbo. Costing the same rice as Tarabo, he's a solid archer, but is otherwise inferior to his counterpart in nearly every other way. Honbo is essentially a one-trick Suzume and it's for you to determine whether the trick is worth it. His Once Per Turn Ki Feat, Flitter, (for which you will be need bonus Ki if you are to access it every turn) enables him to be placed within 2" when an opponent moves into base to base with him. It may not seem like much, but it means your opponent has to judge whether it is worth losing an activation just to clear it. The other concern for your opponent is that Honbo can use the ability to disappear behind an assailant, meaning he can then shoot them in the back the following activation having gained the element of Surprise. The slight downside to Flitter is that it is an Active Ki Feat, so you will be likely deciding whether to activate it in your first activation of every turn. Do you burn the Ki you've stored up or save it for something more useful, like his other Ki-Feat, Quick Reload? (which enables him to get 2 shots off in a turn).
Honbo's other benefit over Tarabo is that like all starter box Suzume, he has Co-ordinated Attack [Suzume] meaning that if teams up with one of his sparrow chums, he will be rolling an extra die in melee. Against low level characters like Cult Burakumin or Ito Ashigaru, this may well tip the balance in your favour, but then if you're throwing up to 30 rice of Tengu at a 10 rice model, you'd hope to come up on top.
Overall, if you're selecting one or the other, Tarabo's range of abilities means he has the edge over Honbo, but if you're going for a list heavy with sparrow archers, then Honbo's Ki Feat makes him a tricky proposition to pin down.
Seibo

There are very few Suzume that you actively want to be in combat for the specific purpose of doing damage, but Seibo may just be your murder sparrow. It is clear however that he is not exactly a combat monster by himself and will be wanting to benefit from the Co-ordinated Attack [Suzume] trait. Therefore, you're definitely going to need some other Suzume to hold up his intended targets. The other way that Seibo will use to gain the upper hand is by Surprising his would be opponent and his Ki-Feat, Apparition, will assist here. The 2" place will help you get out of LoS especially as it is an Active Ki-Feat meaning that you use it before Seibo's activation. Therefore a Suzume can reposition Seibo ready for a Surprise attack, move into melee with the target (this can turn it away from Seibo too) and then endeavour not to die. When Seibo enters the fray, the opposing model will be on -2 melee statistic with Seibo on a minimum of 4, meaning that you may be more confident spending one of the dice for Combo Attack.
Of course, you may just want to use Seibo's mobility to stay out of trouble and focus on the scenario objectives/zones. In this regard, Apparition is an effective way to get about and move into useful positions. It is also NOT once per turn, so if you can allocate him a lot of Ki (which Tengu can do via the Channeling trait, a Gorinto terrain card or the Spiritual Harmony event card), you can have him popping up all over the place over the course of a turn and making a nuisance of himself.
Shubo
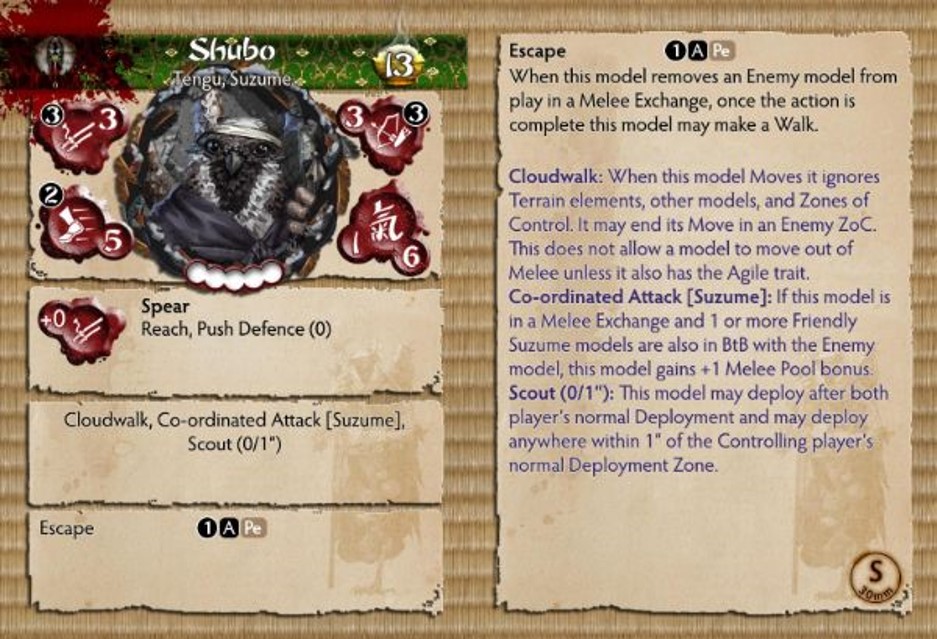
Whenever you come across a model that is a bit of a head scratcher, it's sometimes worth descending to the basic equivalent (in this case, Zephyr Guard) and seeing what else you're getting for your rice. In this case, the extras consist of a 0 cost Special Defence, a better spear (i.e. 0 melee strength as opposed to -1) and Co-ordinated Attack [Suzume]. However, this comes at the cost of Armour (1) and the free 1" place at the start of every turn. There are some benefits in that Shubo is the better melee prospect and will be better at defending zones, but the free 1" place of the Zephyr Guard and indeed Zenkibo is a very powerful bonus that you will effectively be sacrificing by choosing Shubo. Yes, he does have a Scout of 0/1", but this will be eclipsed by the 1" place in the first turn and every subsequent 1" place thereafter.
His Ki-Feat, Escape, is interesting, but pretty situational as you have to be in a position to benefit from it (i.e. attacking a weakened model, cos Shubo is not one-shotting anyone) at the point where it might be useful. A simple tactic would be to engage an exhausted model that is already engaged by a Suzume - so you can benefit from Co-ordinted Attack [Suzume] - finish the opponent off and then Escape back to safety / a better position. A potential example during a Zone control scenario is shown below. At the start of Shubo's activation, the control of the Zones is as follows - left = Tengu, centre = Ito, right = tied. Therefore both the Tengu and Ito player will score 1 scenario point each (so the VP won't be scored by either player). However if the Tengu player were feeling cocky, he could send Shubo to attack Chiyo. If he manages to kill Chiyo, he can use Escape to go back to the left zone. Now both the centre and right zones are tied, with the left one under the control of Tengu. Tengu therefore score 1 SP and if the position stayed thus, would get the VP as well.

Shubo is essentially... fine. His main role is defensive, rolling 3 dice in defence and subsequently pushing opponents away from an idol or out of a zone. There are however a not insignificant number of characters who have a reasonable or better chance of defeating him in melee, so you need to be wary of who is coming to challenge his position. If you can set up circumstances where he can finish off opposing models, then Escape may well be worth using, but it's likely you'll also have to set up circumstances where you can benefit from it in a meaningful way.
Tarabo

Regardless of whether you play Blue Gale Scouting Party, Shepherds of the White Mesa or Wind Watchers or indeed a list without a theme, Tarabo is the model that nearly all Tengu players will be making use of. Everything that applies to Blue Gale Scouts is equally relevant here, but there are a few additional bonuses as well.
He can boost his Ranged statistic and unlike say, Honbo, this is made more feasible with his Ki statistic of 2. Thanks to his feathered chums, he is also Aware meaning that he can never be Surprised. His other Ki Feat, Athleticism, will see him gain Jump Up (situationally useful) and Dodge (always useful) with the latter increasing his survivability in melee.
The main reason you are taking Tarabo however is for his Unique effect that inflicts Stunned on an opposing model at the start of EVERY turn. Melee for Tengu is a risky proposition (especially for Suzume), not least because of their low health, but also because they lack many of the traits - Prowess [Melee], Feint, Brutal etc - that enables you to best an opponent. Any effects that you can stack on the enemy to tip the balance in your favour are well worth seeking out. Note that his Unique effect means that you probably want him on the table for most of the game, so don't spend too long using Flank (if at all).
Zenkibo

A fairly solid basic model that benefits from the same free 1" place that Zenkibo has at the start of every turn. One point worth mentioning at this stage is that if this is combined with the same benefit from Blue Gale Scouting Party theme or the Suzume Flock event, not only do you get to do multiple places at the start of the turn, but many of your models will potentially have had the opportunity to move out of multiple lines of sight. Therefore even if you lose the Tactical Roll, you opponent will be faced with the dilemma of being Surprised by lots of your models and will have some challenging decisions to make about what they do first.
A short nod to Drag Defence as a fairly decent means of getting your opponent's models out of a zone or away from an objective. Even with sacrificing a die to use it, the Zephyr Guard will still be rolling 2 dice in defence and because of the importance the action (being dragged off an objective means they have to go back to it again before they can influence it, costing at least one more action), it might be a means of bluffing your opponent to roll all dice in attack.

Comments
Post a Comment